Features
Training
Extrication Tips: October 2015
A common rescue incident in the fire service involves a person trapped underneath a motor vehicle; this may be a result of a pedestrian being struck at a road crossing, or a weekend mechanic working on the underside of a raised vehicle unattended when the support method fails. There are a few options to remove a patient from this intensive situation quickly and effectively with the least amount of danger to the victim.
September 28, 2015
By Randy Schmitz
Rescuers’ tools of choice vary depending on what they carry on their rigs. Most first-response vehicles carry hydraulic spreaders, Jackall jacks, high- and low-pressure lifting bags, wheeled floor jacks, and a standard extension ladder, all of which can be used as a space-creating devices.
For all lift-type evolutions, rescuers need to follow the lift-an-inch-crib-an-inch rule. In such cases where a person is impinged or is in direct contact with a large object, even less than an inch is best practice.
Let’s start with the most readily deployable tool – the hydraulic spreader. Spreaders are versatile and usually easily accessible on trucks.
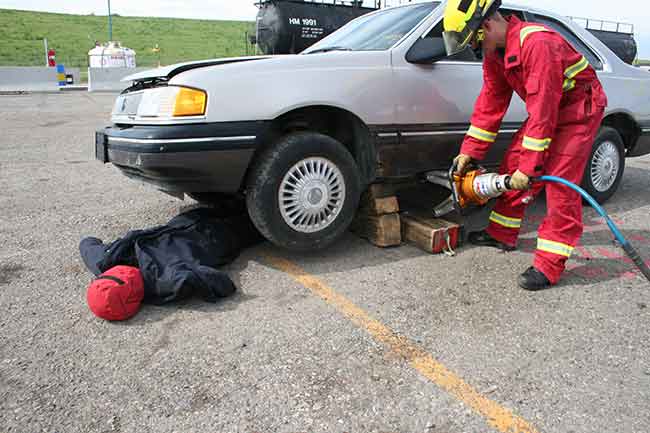
After initial assessments are done, it is important to secure the front or rear tires with blocking or rubber wheel chocks to stop any vehicle movement. The vehicle can move up to an inch or more even when it is in gear or placed in park. If safe to do so, and won’t affect the patient underneath, engage the emergency brake to help reduce movement.
The second most important aspect to reduce vehicle movement is blocking the side opposite your lifting position in order to take the suspension out of the equation. Doing so prevents one end of the vehicle from crushing down onto a patient while you force the other end upward.
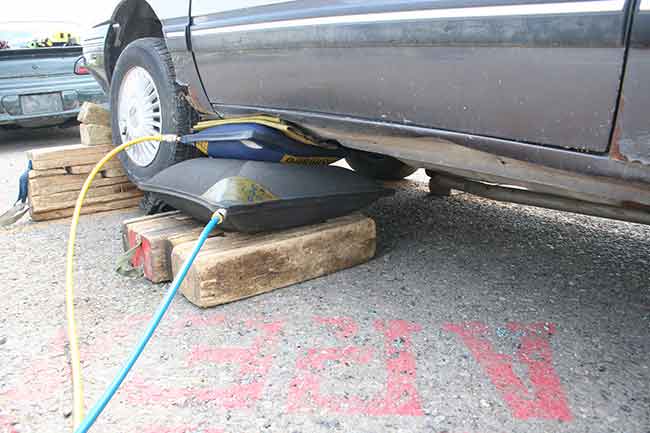
The next step is to continue to stabilize the side of the vehicle at which you’re lifting. At this time, use a lift platform to place the spreader tips as close to the patient as safely possible while ensuring that the weight on the patient is lifted off first.
In this case, the strongest area of the vehicle is the rocker panel directly below the driver’s door. Ensure the metal in this location is solid and strong and can handle the pressure of the spreader as it lifts the vehicle.
A standard inverted step chock and a wedge of equal width work well together as a lift platform to reduce the amount of space between the ground, the spreader tips and the underside of the vehicle.
From here, insert the spreader tips in between the rocker panel and the lift platform. Then, under the direction of the extrication officer, slowly engage the tools and begin the lift.
This part of the evolution requires strict control to reduce load shift or failure. The lift must be done slowly enough to allow for even insertion of a wedge or suitable blocking material. There must be minimal distance at all times between the underside of the vehicle and the blocking. Initiate a freeze periodically to check for instability and ensure all blocking remains intact throughout the entire lifting operation.
It is imperative that a rescuer is located as safely as possible next to the victim to monitor for sufficient patient removal space. Lift just enough to remove the patient with a couple of centimetres of space between him or her and the underside of the vehicle’s components. Keep the lift height to a minimum; the higher the lift, the more unstable the vehicle or lifting tools may become.
A Jackall or first-responder jack deployed as a backup device is of great benefit during the lifting phase. If a load shift does occur, the jack can capture the weight of the vehicle temporarily and allow responders to reposition the primary tool and complete the lift.
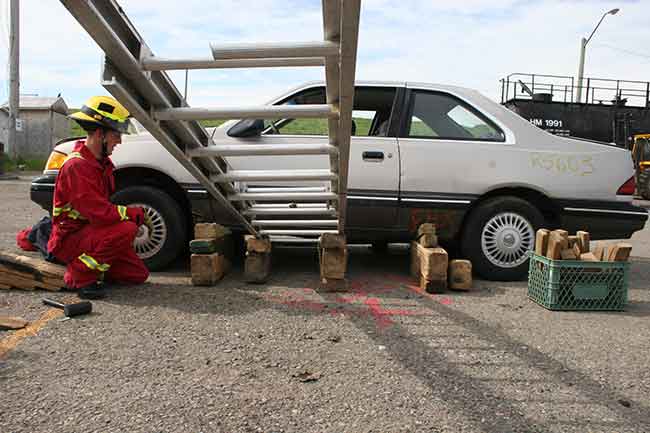
Another means of creating space quickly is to use a standard extension ladder. A ladder works well when there is ample room around the vehicle.
Once again, begin by blocking the opposite side of the vehicle.
Next, situate two inverted-step chocks so that the thinner ends are placed just beyond the underside of the rocker panel as close to the patient as possible; the chocks should be roughly 50 centimetres (20 inches) apart, so that the ladder rails are centered in the middle of each step chock.
Depending on the height of the step chocks, a 4×6 wedge can be used to fill space and increase the angle of the ladder once it is placed on top of the makeshift fulcrum.
Avoid extending the fly-and-bed section of the ladder; rather keep it in the stowed position to allow for maximum strength of the rails while lifting the vehicle upward. Place a piece of rubber mat or protective material between the ladder rails and the underside of the rocker panel to minimize damage to the ladder.
Once the ladder is in position, a minimum of two rescuers should position themselves at the end of the ladder and on either side of the rails. Again under the direction of the extrication officer, the two rescuers use their body weight to apply downward pressure on the ladder and slowly control the upward lifting motion of the vehicle.
As the lift slowly progresses, another two rescuers positioned on either side of the ladder at the vehicle are cribbing and inserting wedges to maintain as minimal clearance as possible in case of load shift or failure.
Be aware that any ladder used for a rescue of this type should be inspected and tested for damage.
The total time for these evolutions should be anywhere from one minute to two minutes from start to finish.

Here is a list of the various tools used to perform the above tasks and their pros and cons:
Spreader
Pros: high lift capacity, requires minimal space to insert tips to lift large objects, and is quick to deploy from its location on the rig. The spreader is often the tool of choice for rescuers.
Cons: small surface area of tips can cause an unstable load the further the spreader arms are apart, requires placement on a strong, solid section of the vehicle to handle the pressure of the tips.
Lift bags
Pros: requires a small insertion space and has high lift capacity with excellent fine-tuned control, great for a one-man operation.
Cons: time consuming to set up, may cause load shift and requires a flat surface on which to lift.
Jackall
Pros: versatile, quick to deploy and can operate in limited space. Good backup or secondary device for one-man operation.
Cons: an inherently unstable and load-bearing handle that can strike the operator if he or she is caught off guard.
Ladder
Pros: quick deployment, simple to operate, can rapidly lift heavy objects with body weight.
Cons: requires large, open area to operate, at least a two-man operation, and may damage ladder, or fail if ladder is already damaged. Requires protective material between the ladder and car to minimize damage.
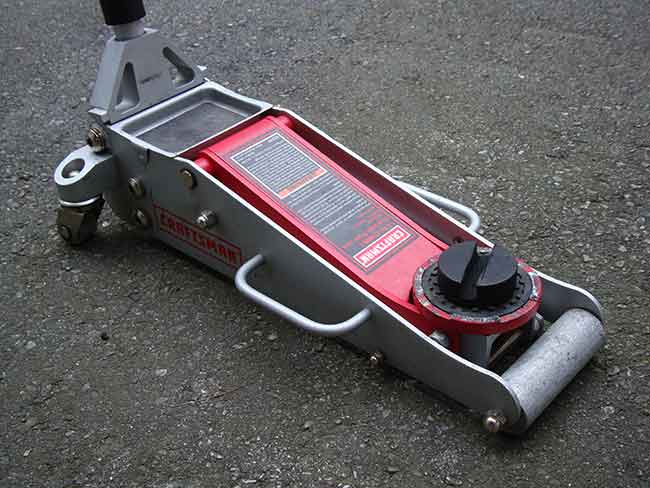
Floor jack
Pros: can be wheeled into place quickly, has the ability to reach a lift point from a distance due to the long handle, and high lift capacity.
Cons: may take up valuable space on a fire apparatus, limited versatility for other tasks, can be hard to control the release speed of the weighted object.
Having options in your mental toolbox allows for the best possible outcome for patients.
Not all tools and their applications will work in all rescue situations, however, consistent training helps rescuers to make clear, confident decisions.
I would like to dedicate this column to Todd Nabozniak and his family; Todd lost his father, Russell Nabozniak, to an unfortunate incident and thus I was inspired to write this material. RIP Russell; you are missed as a father, husband and grandfather.
Randy Schmitz is a Calgary firefighter extensively involved in the extrication field. He is the education chair for the Transport Emergency Rescue Committee in Canada. rwschmitz@shaw.ca @firedog7
Print this page