
Features
Training
Back to Basics: May 2009
Are you doing everything you can to hit the hydrant? Even though this is a basic task, we often overlook the importance of executing it effectively. We have all seen pictures of hydrants with their supply lines snaking through car windows or underneath vehicles, all twisted and full of kinks.
April 27, 2009
By Mark van der Feyst
 |
|
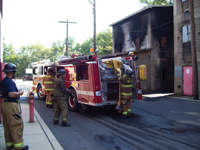
| Photo 1: A firefighter is going to secure the hydrant. First he is going to pull off the supply line. |
|
 |
|
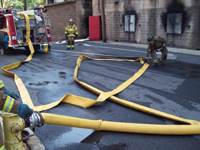
| Photo 2: When securing the hydrant, it is important to flake out the hose so that kinks will not be formed. | |
 |
|
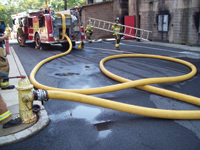
| Photo 3: When laying the supply line out in an “S” shape, you remove the kinks in the line and allow the hose to be fully charged. | |
 |
|
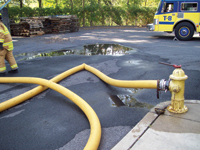
| Photo 4: An example of a kink in the supply line. This one kink can reduce your water supply by 50 per cent. |
|
 |
|
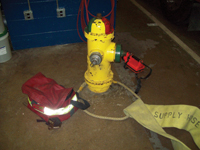
| Photo 5: Securing the hydrant using a rope attached to the supply line and the bag of tools. | |
 |
|
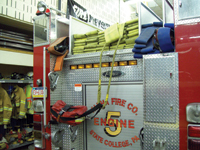
| Photo 6: The rope method packed on the back of the truck. Photos by Mark van der Feyst. |
Are you doing everything you can to hit the hydrant? Even though this is a basic task, we often overlook the importance of executing it effectively. We have all seen pictures of hydrants with their supply lines snaking through car windows or underneath vehicles, all twisted and full of kinks. I can recall one fire to which I was dispatched where the first-due engine established the water supply and managed to kink the supply line underneath the engine. The engine had no access to a water supply because of the number of kinks created. Many of us don’t hit the hydrant as frequently as we should due to the low numbers of fires we attend, and, as a result, we get rusty at carrying out this simple task.
Hydrants are common in urban areas but we also find them in some rural areas. Industrial plants in rural areas often have their own private hydrant systems. I have been to a few towns that relied on rural water operations for water supply but had two or three hydrants.
The first step in hitting the hydrant is to stop the truck at the hydrant and allow a firefighter to get off, secure a good section of supply line (either four inches or five inches) and take the necessary hand tools. (See photo 1.)
Once the firefighter has the needed supplies, he will wrap the supply line around the hydrant. This is done so that when the fire truck drives away toward the fire (forward lay), the supply line will not be dragged away and therefore the line from the back of the truck will be deployed over the length of the forward lay.
We sometimes instruct firefighters to kneel on or stand with one foot on the supply line so that the hose will not take off on them. One method that works well is called the rope method. As you can see in photo 6, a rope in a continuous loop is wrapped around a section of hose and a bag of tools. This method allows firefighters to grab all the items they need at once with just a pull of the rope. The bag of tools should contain items such as a spanner wrench, a hydrant wrench, a gate valve, a flashlight, a radio and hose adaptors such as storz.
Once the firefighter has the rope in hand, the amount of supply line required to hit the hydrant can be pulled off the truck?. As you can see in photo 5, the rope will also help secure the supply line to the hydrant so that the fire truck can drive away. This allows the firefighter to save some time by not having to wrap the supply line around the hydrant and then kneel or stand on it. The firefighter can immediately begin work to establish the water supply.
Often when we are establishing a water supply we are not in ideal conditions because of weather or lighting. And, often we lose some of our tools when we are opening up the hydrant due to tall grass around the hydrant, muddy conditions or deep snow. It is good practice to always place your tools, hydrant caps and flashlight at the base of the hydrant. This way, if you cannot see where the hydrant cap went because it’s dark or because of tall grass, you can feel down to the base of the hydrant and you will find what you are looking for. Another good practice is to place your hydrant wrench on top of the hydrant. (See photo 3.) Often we throw our tools on the ground in a rush to establish water supply. When we do this, we risk losing them. By placing the hydrant wrench on top of the hydrant, we guarantee that it will always be there when we need it.
When we hook up a supply line to the hydrant, we sometimes forget to use gate valves. Gate valves are great assets that allow us to add additional supply lines if needed, without having to shut down the hydrant. They also allow us to shut down certain supply lines without having to shut down the hydrant. In a case where a hydrant stem breaks, we are able to disconnect the supply line and use the gate valve to shut off the hydrant. Often we miss using a gate valve on the main supply line for the four-inch or five-inch steamer port, and when the hydrant stem breaks we are stuck because we need to leave our supply line attached to the hydrant and the pump panel in order to shut down the hydrant. Until maintenance crews arrive on scene to fix the problem, we have a dedicated “gate valve”, which is our fire apparatus.
It is also important to flush out the hydrant before we connect our supply lines to it. By flushing the hydrant, we are checking to see if the hydrant is working and also if there is any debris inside that may block or clog our supply line. This check does not take very long to conduct and is often forgotten about.
One of the major problems we face is hose-line kinks. We often see this with smaller hand lines but the problem also exists with supply lines. Photo 4 shows an example of a kink in the supply line. This one kink will reduce the amount of water pressure and supply by as much as 50 per cent. Now, add in two or three more kinks and you will quickly see how we sometimes compromise our water supply. Kinks form because of irregular bends in the hose. For the larger supply lines (four inches, five inches or six inches), we need to ensure that we have large, smooth curves or bends in the line. One way to accomplish this is to use the S or figure-eight method. In photo 2, a firefighter is flaking out the supply line in a figure-eight shape. This shape allows the hose to become fully charged and ensures large smooth bends in the line. We can see the result in photo 3. This method works well in short distances between the hydrant and the fire truck. When we have a 100-foot section of supply line pulled off and a distance of 40 feet, this method will allow us to ensure no kinks will form. Often we try to flake out the hose in a Z pattern, which tends to contributes to the kink problem.
Removing a kink in a large diameter supply line is not easy. Firefighters often try to remove a kink using their hands and pulling with their backs to straighten the supply line out. You may be able to do this with a four-inch supply line but with a five-inch or six-inch supply line you will definitely hurt yourself. If you have to remove a kink from a large-diameter supply line, try using a piece of webbing wrapped around the line and have another person help you pull the supply line straight.
Securing a water supply using a hydrant may seem easy but often it is not practised enough. By going back to basics, we ensure the fire we are called to will go smoothly from the start by establishing a water supply with no kinks.
Mark van der Feyst began his career in the fire service in 1998 with the Cranberry Township Volunteer Fire Company, Station 21, in Pennsylvania. He served as a firefighter and training officer for four years, then joined the Mississauga Fire & Emergency Services, where he served for three years as a firefighter and shift medical instructor. He is now with the City of Woodstock Fire Department in Ontario.
Print this page