
Equipment
Truck Checks: Air-brake maintenance – part two
Air-brake maintenance – part two
December 6, 2007
By Don Henry
 I hope you found the last issue on the draining of air tanks useful and are now ready to conduct more air-brake system maintenance. The next two issues to address are the slack adjusters and the inspection of the air-brake system for leaks.
Of the all the maintenance tasks you could be asked to conduct during a routine inspection of the truck, the one I always stress the most to my apparatus students is air-brake slack-adjuster angle and travel. More air-brake related accidents are caused by this than anything else. As the brakes are used, the linings of the brakes and, to a lesser extent, the metal inside the brake drums, wear. We must adjust for this wear. If we do not, the brake push rods will have to travel a greater distance and will not force the brake shoes against the brake drums.
 Remember, it is the brake linings that forcibly contact the drum, creating the friction to slow the truck. It's very easy to tell if the brake push rods are properly adjusted but it requires two people to accomplish the task. Start the truck and build the air pressure up to maximum of about 120 psi for trucks made after 1975 (please don't tell me you have a truck made before 1975 but if you do the pressure is only 105 psi). With the wheels blocked and the spring brakes released, have one person make and hold a full brake application. The air-service brakes will apply; this is easy to see as in all cases the brake push rods extend from the brake's camber pots.
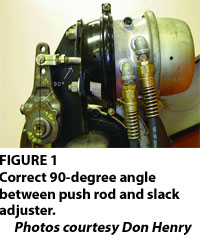
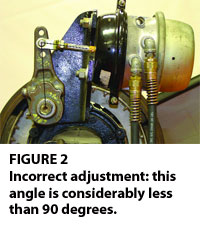
Take a look at both the angle that is formed by the push rods to the slack adjuster and the distance these rods travel. (See figure 1.) Ideally you want this angle to be 90 degrees or more with the brakes fully applied – never less than 90 degrees. If the angle becomes less than 90 degrees you will not be able to impart to the brakes the full force of the application. To give an example, if the baseball batter hits the ball solid and at 90 degrees to the bat, the ball is out of the park. If he hits the ball at an angle that is less than 90 degrees the ball will dribble down the third base line with very little energy imparted to it from the bat, even if the batter took a mighty swing. The same applies to the air brake if the angle is less than 90 degrees. I have drawn a black line on figures 1 and 2 to indicate the angles. (See figure 2.)
In figure 2, note the yellow marker stripe around the push rod shaft next to the brake chamber. This indicates that the push rod travel is dangerously excessive. Not all brake chambers have this feature. Now, if the brakes are set at between 95 and 100 degrees then, as the brakes are used, the angle will be reduced to the ideal 90 degrees. If the brakes are not checked for a period, the angle will decrease to a number less than 90, decreasing the ability of the truck to stop.
 Also, the brake push rods will have to travel a greater distance and will need more of the precious supply of air to stop the truck. How much of a greater distance? It is not uncommon to have a push rod travel of less than one inch on a properly adjusted brake. For any distance greater than 1.5 inches you most likely need to adjust the slack adjuster for that wheel. It should not be necessary for the driver/operator to have to cut the brake push rods – this should have been done correctly at the repair depot or at the factory during the building process. If the normal adjustment of the slack adjuster does not bring the angle back to 90 degrees or more, with 1.5 inches or less of the push rod travel, then a qualified emergency vehicle technician or heavy-duty technician should repair the brakes.
There are two major types of slack adjusters used on modern foundation brakes. The common type for many years was the adjustable design. In recent years, and after the advent of anti-lock brake systems, the self-adjusting or automatic slack adjusters have been used. The adjustable type is very easy to set and easily within the ability of the driver/operator. Build the air pressure to 120 psi and shut off the engine. I strongly suggest wearing eye protection when under the truck. After making sure one wheel is blocked, jack up the opposite wheel – just off the ground will do. Make sure the spring brakes are released and then measure the distance from a point on the brake slack adjuster to a point on the brake pot.
Remember that number. Then, have someone apply the brakes by fully depressing the truck brake pedal.
Take a look at the angle formed by the slack adjuster and the brake push rod and measure the distance that the brake rod has travelled. When you're sure of the angle and the distance, have the operator release the brake pedal.
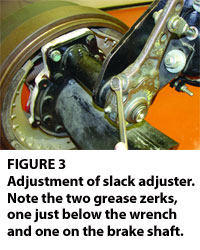 Now, let's say the brake travel is over two inches and the angle is, say, about 75 degrees (see figure 2 ) – this is a brake that needs adjustment. Place a wench on the lock of the 9/16 adjustment bolt (see figure 3) and push the wrench in to the slack adjuster. This will release the lock ring and allow the adjuster to turn. Which way do you turn the wrench? Well, you have a 50/50 chance of doing it right! But remember this: the brake pot rods always come out when the brakes are applied. This will rotate the brake shafts that are connected to the slack adjuster. You want to turn the wrench in whatever direction it takes to cause the brake shaft to turn in the direction it would normally turn when the brakes are applied. If, as you turn, the slack adjuster gets farther away from the brake chamber pot, you are going in the wrong direction. Tighten the wench just until the brake shoes contact the drums. Try to spin the wheel (remember, it is off the ground). The wheel should not be able to spin. Now, turn the adjuster bolt back about one half turn. Spin the wheel and listen for any sounds that would indicate a dragging brake shoe. If no sound is heard then make sure the lock pops out and engages the adjuster nut.
Now, let's check your work. Have the operator push on the brakes again. Hold the application and measure the rod travel and angle formed. In this case, the travel is now three-quarters of an inch and the angle formed in 95 degrees.
Now, go do the other rear wheel. It is best if the distance is the same for both wheels. In reality, this is very hard to do so you are allowed a variance of one-half inch on rear axles. For example, if one side had to be set at three-quarters of an inch, then you could be off as little as one-half inch or as much as one inch on the other axle. It is important to keep the adjustment within this difference to ensure the truck stops evenly and does not pull to one side. The front brakes are allowed a variance of only one-quarter inch for this same reason.
The reason for jacking the wheel off the ground is to ensure it spins free and the brakes are not dragging. If, as you spin the wheel, you hear the shoe contact the drum each time it makes a complete turn, you may have an egg-shaped drum. This can happen from the normal use of fire apparatus. It is caused when a hot drum is splashed with water, such as from a mud puddle or pothole. One side of the drum cools very fast and the drum gets egg shaped. You will need to replace this drum. After you complete the rear brake adjustment, do the front brakes. When you're under the front axle you will notice the front brake pots are not as large as the rear. This is because the front brakes have a lighter stopping load than the back axle brakes. The angle for these brakes is the same as the rear but the allowable travel is between less than three-quarters of an inch and one inch.
Myth three: (the first two myths were in part 1 in September). You should disconnect the front brakes so you will not skid when stopping. Nothing could be further from the truth. I have an excellent video made in the early '80s that completely dispels this myth. All trucks must have fully functional front brakes; either put them back on or take the truck off the road. There are many different types of self-adjusting slack adjusters and it is not within the scope of this article to cover all models and their adjustments. If the adjusters are working, then they should self adjust when necessary as the angle and the travel become excessive.
Unfortunately, like all things mechanical, the adjusters do, on occasion, fail. This is often because of lack of lubrication. When you were under the truck, I am sure you noticed the grease zerks on both the slack adjusters and the brake shafts. As strange as it may sound, you do need to grease your truck's brakes. The purpose is twofold: not only do we want to lubricate the mechanical parts; we also need to force any moisture out of the mechanisms, i.e.: water from rain or washing. It is my opinion that the need to drive this moisture out is extremely important. If the self-adjusting mechanism seizes due to rust, the brake will, over time, fall out of adjustment and become ineffective.
I believe we have become complacent about brake inspection and adjustment because of the automatic slack adjusters. A properly operating automatic slack adjuster should not need to be adjusted by the operator but unless you get under the truck and take a look, how will you know it is working?
It has been the case in recent years that automatic slack adjusters have come out of adjustment. This often happens to the more experienced, careful drivers. This, of course, does not make much sense, until you understand that the brakes need a full application to adjust themselves. The experienced driver makes gentle brake applications and uses the auxiliary braking devices and this is not enough force for the brakes to self adjust. The inexperienced driver may make hard stops and the slack adjusters will self adjust. I am not suggesting you drive down the road at a great rate of speed and hammer on the brakes to cause the self adjusters to work. Rather, in the fire hall, press down hard on the brake pedal three or four times. This can also be incorporated as part of an air-compressor governor cut-in, cut-out test. If the slack adjusters do not self adjust, then head off to the repair shop.
The second item of air-brake maintenance involves looking for air leaks. Is a fire truck allowed to have air leak? The answer is yes. NFPA 1911 and the CMVSS 121 allow a leak of two psi on the spring brake side and two psi for the service brake side. When you push in on the brake release button you apply air to compress the massive springs in the rear of the brake chambers. In the past, people have called these "dynamite" brakes or "maxi" brakes. Their real name is spring brakes. If the air pressure were to leak out of the truck, then there would not be enough air pressure to keep these spring released – they would expand the push rods and would apply the brakes.
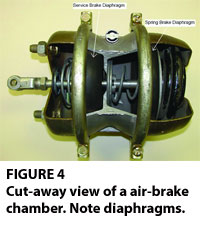 This normally happens if the air pressure in the two air tanks (primary and secondary) falls below 25 to 45 psi. (See figure 4.)
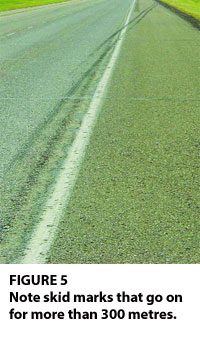
It can also happen quite suddenly if the rubber diaphragm that separates the spring from the chamber rips or ruptures. This diaphragm is flexed each time you push in or out on the park brake button on the truck's dash. If this diaphragrm rips, then the brakes on that side of the truck will suddenly come on. This will cause the wheels on that brake to lock up and leave very ugly black skid marks.
I am sure your department has answered calls on the highway for these vehicle tire fires; the tires can get so hot they often catch on fire. I am sure you have noticed these marks on your highway. (See figure 5.)
Lucky, these diaphragms sometimes give advance warning of their demise. Make sure you block the wheels, listen very carefully at the rear of the vehicle for an air leak, with the vehicle's spring brakes released (spring brakes are also called parking brakes). After a two-minute stabilization period, the amount of allowed leakage is two psi per minute for a truck. Any sound of leaking air from the brake chambers may indicate a potential diaphragm failure.
Warning, do not try to fix this yourself, take it to a trained brake professional.
 If you remove the band containing the rear spring brake, the spring will violently expand and it could kill, or, at the very least, injure you. Most technicians will not even try to repair the brake chamber unit, rather they will put on a new brake chamber unit.
While you're at it, change the other chambers because they are just as old as the one that failed. Make sure you get an exact size match for the replacement.
If the truck has passed this leak test then move on and check the service-brake side. Have someone with a large, strong leg press down hard on the brake pedal. Air will travel to the air-brake chambers and the brake chamber push rods will expand. Listen very carefully. You may hear valves groan and creak. Don't worry. This is just the system equalizing itself. The standard gives you two minutes for the valves to stabilize. After this time you are allowed to lose up to four psi per minute.
The reason this may seem a bit much is that you have the two psi from the previous test plus the two psi from this test for a total of four psi. That's a lot of air but you should be able to hear even a one psi leak.
Use a bit of soapy water to find the leaks. It is nice to have a truck that does not lose any air pressure when left overnight but that is not always possible or practical. You could get in the truck to answer a fire call and have the low-air warning light and buzzer come on after the engine starts. It would take time to build up air before the spring brakes could be released and the truck able to move.
One item I have always found useful is the low-air warning wig-wag. It is installed above the visor for the driver and if the air pressure were to drop this device would give you a very visual warning. Remember, the buzzer and light on the truck's dash only work after you turn on the key to start the engine. The wig-wag lets you know you have a low-air problem as you walk past the truck in the fire hall, before you even start the truck.
If the on-board auxiliary air compressor fails or if the shore line was not connected properly, then you would have advance warning by just looking at the truck's windshield that you had a low-air pressure problem before you needed the truck.
Go to the Roadranger website – www.roadranger.com/Roadranger/servicesalesliterature/index.htm – for some excellent videos on brakes. That's right, a transmission site for brake information. On this page you will see a section called Brake. Click on Operation/Driver Instructions for an excellent video on using your brakes called RRSD0001. The next video is also in the Brake section but look for a headline on service and troubleshooting. This will take you to a video also called RSSD0001 on brake maintenance and overhaul. The videos are available online for free or on DVD for $20. I suggest you use a high-speed connection and do this soon as web pages do change.
Remember, unless you walk to the fire you need to have a good maintenance program.
Don Henry teaches in the Automotive Service Technician and Heavy Equipment Technician programs at Lakeland College in Vermilion, Alta., where he has been a faculty member for more than 17 years. He has co-developed and delivers Canada's only post-secondary level fire-apparatus maintenance program and has completed a textbook on fire apparatus.
Print this page