
Features
Training
Extrication Tips: April 2011
When rescuers attend collisions involving trapped or pinned patients, standard extrication evolutions such as roof-and-door removal or dash lifts and rolls are often sufficient for removal of the occupants.
April 1, 2011
By Randy Schmitz
When rescuers attend collisions involving trapped or pinned patients, standard extrication evolutions such as roof-and-door removal or dash lifts and rolls are often sufficient for removal of the occupants. Sometimes, however, patient removal requires more thought and ingenuity.
Frontal offset collisions are situations in which a driver is trapped or pinned by the steering wheel rather than by the dashboard. Much time can be saved by relocating the steering column rather than by lifting or rolling the dash. The steering-wheel pull has proven effective in these types of entrapments.
 |
|
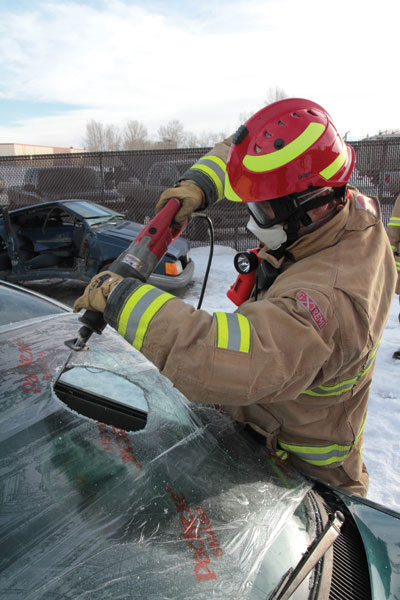
| Photo 1: Cut a circle in the windshield so rescuers can drop a chain to wrap around the steering column. Photos by Rob Evans | |
 |
|
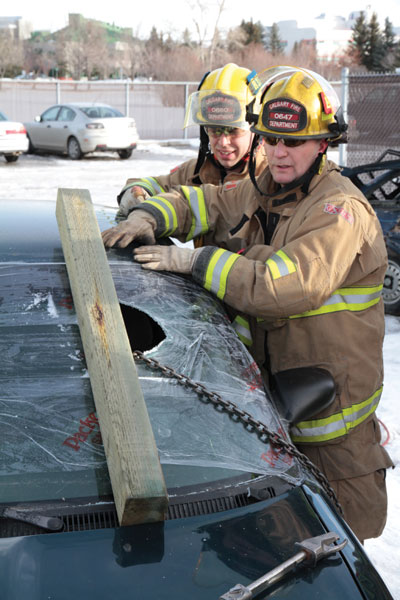
| Photo 2: Place a 4-inch x 4-inch x 48-inch post on top of the windshield. | |
 |
|
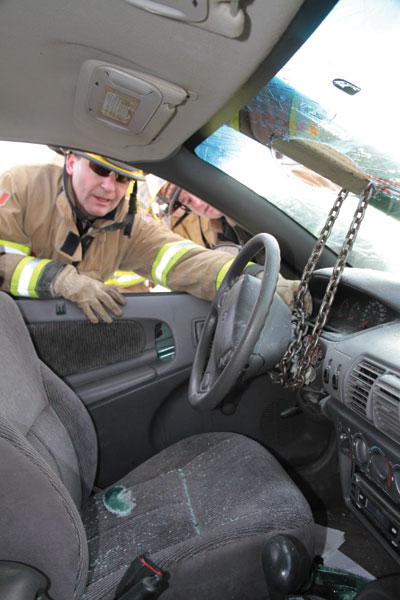
| Photo 3: Drop one end of the chain down the hole and wrap it around the column. | |
 |
|
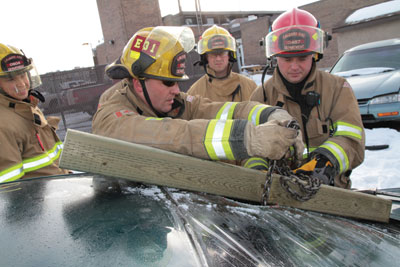
| Photo 4: Feed the loose end of the chain through the hole and onto the post; attach a hook. |
|
 |
|
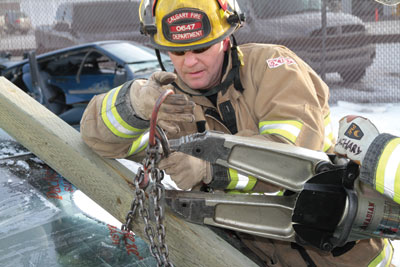
| Photo 5: Insert the tips of a hydraulic spreader under the chain. | |
 |
|
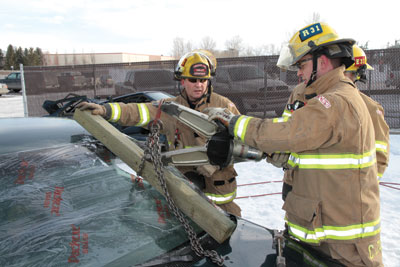
| Photo 6: Start to spread the arms of the tool apart and take up the slack in the chain. | |
 |
|
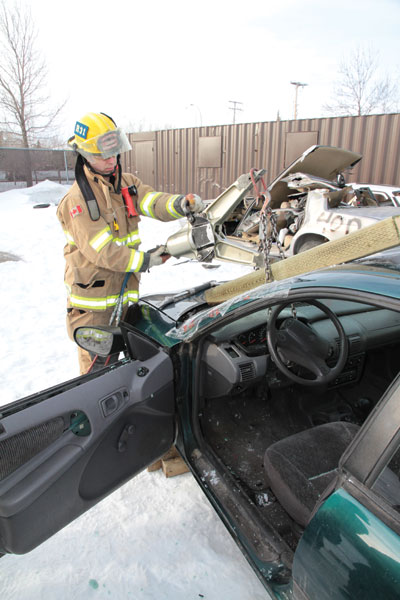
| Photo 7: Operate the tool to force the chain to pull up the column and the steering wheel. | |
 |
|
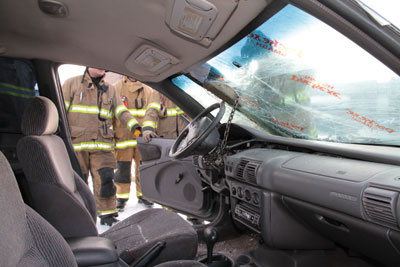
| Photo 8: Continue until there is room to remove the patient. | |
 |
|
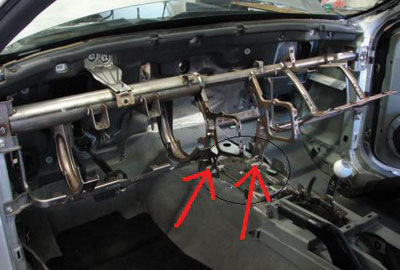
| Photo 9: It is imperative to cut the braces to facilitate movement of the dashboard. |
|
 |
|
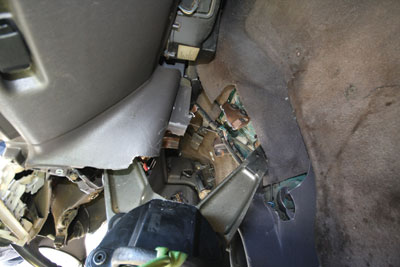
| Photo 10: Once the cuts have been made, insert spreader tips into the centre where the brackets were cut.
|
Some rescuers believe that they shouldn’t attempt a steering-column pull
on a front-wheel drive vehicle because the rack-and-pinion steering
column can collapse and impale the driver. In fact, a steering-column
pull on a front-wheel drive vehicle can be completed safely as long as
rescuers take it easy and don’t overdo it.
These collapsible steering columns features two or more sections joined
together by knuckle joints. In the1980s, manufacturers such as Plymouth
and Honda began to use rack-and-pinion steering assemblies, and rescuers
became aware of the issues with the column design. Prior to this,
straight columns were used in most vehicles; they consisted of a
straight shaft that was connected to a steering box mechanism at the
front axles, with gears attached.
Generally, columns failed during extrication exercises because they were
over-pulled; this usually happened during training when rescuers were
overly eager. Rescuers must understand that they need to displace or
relocate only whatever is trapping the driver until the patient is
removable. In most cases, that means putting something that has moved
due to impact back to – or close to – its pre-crash position.
Rescuers seem to overdo this in training; even though a dashboard and
steering column displaced four feet in the air looks cool, and even
though there are benefits to learning the limits of our tools and
efforts, rescuers should refrain from performing reckless displacements
beyond what is required as this is dangerous for rescuers and patients
and tough on the equipment.
Here is a step-by-step method for removal of a trapped patient. Required
tools are a hydraulic spreader, a four- or five-foot section of
three-eighths grade-80 rescue chain, a 48-inch 4×4 post, a glass master
or reciprocating saw, and dust masks for use during glass removal.
Prior to any extrication procedure, rescuers should try all obvious
options first, such as moving the front seat rearward, manipulating the
tilt steering mechanism, or cutting and bending the bottom section of
the steering wheel ring up and out of the way of the patient. If these
options don’t work, the next step may be the steering-column pull.
- To prepare for the evolution, cut a circle in the windshield just above the steering wheel so there is enough room for a rescuer’s hands to drop a chain down to wrap around the steering column (see photo 1).
- Place a 4-inch x 4-inch x 48-inch post (hardwood lumber is best but pressure-treated softwood works fine) on top of the windshield, just over the steering wheel area, so that one end of the post is supported on the fire wall and the other end is just over the top of the windshield where the roofline meets the glass, and over the hole. (See photo 2.)
- Drop one end of the chain down the hole on one side of the post and wrap it around the lowest part of the column (as close to the instrument panel as possible); a double wrap of the chain around the column is preferred as the chain will bite on itself and this double wrap will minimize slippage of the chain when it is pulled upward (see photo 3).
- Feed the loose end of the chain back up through the hole and onto the opposite side of the post; attach the hook to the existing piece of chain with about three or four inches of slack in the newly formed loop of chain around the post (see photo 4).
- Insert the tips of a hydraulic spreader under the chain but on top of the post. The top tip of the spreader will cradle the chain in the engineered grooves and the bottom tip will rest on the top side of the post. If the D-ring end of the chain is available, insert the tip of the spreader into it. Ensure that there is a limited amount of slack in the chain when spreading; otherwise, valuable spreading distance will be lost (see photo 5).
- Position the spreader so that the coupler end of the tool will not move down into the hood area while spreading.
- Carefully start to spread the arms of the tool apart and take up the slack in the chain until there is slight pressure on the steering column (see photo 6).
- Recheck areas of concern – the wrap of chain around the column and the tips of the spreader – and make sure that the chain is well seated in the grooves or D-ring. Also check the condition of the post and the patient’s entrapment area before starting the lifting procedure. It is a good idea to have another rescuer check the setup of the evolution. Have a set of eyes committed to the entrapment area to watch for any unwanted movement or problems. When pulling a rack-and-pinion steering assembly, the upper portion of the column section will start to move away from the patient. The knuckle joint near the floorboard will also move out of alignment – it is in a slide-in sleeve/boot configuration near where the column passes through the foot-well area. Watch this floorboard area for any undesired movement as you pull the column. Slowly start to operate the tool to force the chain to pull up the column and the steering wheel (see photo 7). Once there is space between the patient’s extremities and the area of entrapment, check to ensure all is well, then continue until the vehicle components return to the pre-crash state or there is sufficient room to remove the patient (see photo 8). If there has been significant crush damage to the roofline area where the top of the 4×4 post is, you may place another 4×4 post transversely across the roofline and under the other post to spread out the crushing force prior to lifting the column.
This same evolution can be performed when the vehicle is resting on its side with the driver’s side on the ground, if the entrapment is minimal; however, if more of the dash and the steering column are on the patient, a greater distance of displacement will be necessary to move or relocate the column and the dash together. The more you displace, the higher the risk of failure; this is generally due to the fact that relief cuts normally made in dash-lift evolutions in the lower A-pillar area will not be accessible because of the position of the vehicle and the driver’s door remaining in position.
If the patient entrapment is extremely severe and the vehicle is in the position described above, roof removal is an option. Once that has been accomplished, the next step is to sever the two dash reinforcement brackets or braces that connect the dash cross-member beam to the floorboard at the transmission hump area. These two braces make up a large portion of the strength that repels crash forces. It is imperative to cut these braces to facilitate any movement of the dashboard (as shown in photo 9). This procedure allows for only minimal movement at best because typical dash-lift relief cuts are not possible due to the side-resting position. Space for tool placement is extremely limited, so chose your tools accordingly; even a mini ram will be difficult to put into position for a lift. Once the cuts have been made by hydraulic cutters or an air chisel with a long bit, insert spreader tips into the centre where the brackets were cut (see photo 10) but be careful to avoid the electronic control unit. (Caution: locate the airbag control module, which is often high up under the dash near the transmission hump; avoid crushing this box as doing so can set off unemployed airbags if the electrical system has not been shut down.) If the support brackets are not completely severed, it is likely that the tips of the spreader will puncture the floorboard and the structural integrity of the floor will be lost; rescuers may have to place a 4×4 block against the floorboard and under the bottom spreader tip to stop it from punching through the floor.
For everyone’s safety, rescuers should tie off their tools at the handle and have another rescuer hold the webbing to take the weight of the tool away from the operator and prevent it from falling onto the patient.
Communication is key to allow slack in the webbing when the tool needs to be repositioned. Attempt to move the dashboard up by locating the top spreader tip onto the thick cross member that spans between the A-pillars. The operator may have to reposition the tool to lock onto the reinforced cross member. Continue to create space until there is room to remove the patent or to insert a mini ram to finish the job.
The steering-column pull and dash displacement are effective when performed properly. Remember, rescuers need to move the vehicle components just enough to get the patient free, not until they reach the limits of the tools just because they can.
Randy Schmitz is a Calgary firefighter who has been extensively involved in the extrication field for 18 years. He can be reached at rwschmitz@shaw.ca
Print this page