
Features
Training
Extrication Tips: Stabilization 101
Stabilization 101
December 11, 2007
By Randy Schmitz
 This two-part series on stabilization will give you a thorough understanding of what is required to perform your duties at motor-vehicle accidents in regard to basic stabilization measures.
Stabilization defined
Vehicles that have been damaged in an accident and from which patients must be extricated are inherently unstable and require stabilization to minimize collapse, shifting or movement of the vehicle(s) before the extrication process begins.
This is a simple but descriptive definition of what stabilization means to the rescuer.
Stabilization is a critical aspect of scene safety. There are two main reasons we stabilize:
1. By stabilizing the vehicle(s) we protect our personnel by making our working environment safer to perform extrication duties;
2. To minimize potential spinal injuries that victims may have acquired as a result of a crash.
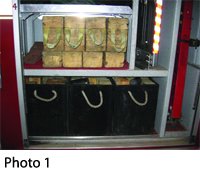 The most basic, common and readily available component of stabilization equipment is wood blocking.
Cribbing or wood blocking is fundamental to extrication operations, as these procedures fill the gap between the vehicle and the ground. These processes involve various configurations, from a single piece of 4 x 4 wedge inserted under a rocker panel to a two-foot high stacked box crib.
Softwoods, such as pine or spruce lumber, are the most popular choice for wood for this purpose, as they are lightweight, durable, inexpensive and readily available. In addition, softwood is, well, softer than hardwood, and metal edges, like those built into the bottom of a vehicle’s rocker channel, bite into the top of the cribbing and remain in place better than they would if hardwood were used. Still, some fire departments prefer to use hardwood such as maple for its longevity and higher crush factors.
Plastic cribbing is also an option and there are a number of different brands available in all shapes and sizes. Preformed “step blocks”, “Lincoln logs” or “lock blocks” are common terms for this type of cribbing that can be stacked or interlocked together like Lego blocks.
 Generally plastic cribbing blocks are made of recycled plastics such as polyethylene, which are heat-injected into preformed moulds and allowed to harden to produce an indestructible material. They are long lasting, will not shrink, crack or splinter and are resistant to chemicals and fluids commonly found at motor-vehicle accidents.
Although plastic cribbing has an extremely long lifespan it is about five times the cost of traditional A-grade lumber and has a tendency to slip on snow and ice in colder climates.
By and large, cribbing lengths range from 16 to 24 inches while18 inches is the most common length for vehicle-rescue work because it fits well into most rescue-truck compartments. Longer, 24-inch lengths seem to work best for trench shoring and collapse rescues.
Cribbing maintenance
Rescue-cribbing surfaces should not be painted because this can cause them to become slippery and can hide damage or defects. However, it is OK to paint the ends of the crib pieces different colours to help identify them in their storage containers. Attaching rope or webbing near the ends can aid in carrying more pieces at once.
Cribbing should be checked regularly for cracks, chemical deterioration and other physical damage. Any damaged pieces should be discarded and replaced.
 How much cribbing is enough?
Although the answer to this question depends on the space limitations of your storage compartments, you can never have too much cribbing. Ideally, an assortment of 50 pieces or more of consistently sized 2 x 4, 4 x 4 and 4 x 6 blocks and wedges should be carried on your rescue vehicle (see photo 1). It’s also a good idea to have extra cribbing stored at your station so it can be made available quickly and brought to the scene of a large-scale incident such as a collision involving a school bus or other larger vehicle than that.
Ratings
According to the FEMA National USAR Response System, weight-bearing capacities are as follows:
For a two-member x two-member layout, 4 x 4 crib capacity = 24,000 pounds or 12 tons (four points of contact)
For a three-member x three-member layout, 4 x 4 crib capacity = 48,000 pounds or 24 tons (nine points of contact)
These weight-bearing capacity values are based on grade-A softwood such as pine. It has been found that pressure-treated wood is as strong as untreated wood if the moisture content is the typical 19 per cent.
Stacked- or box-crib height should not exceed three times its footprint if all contact points are covered. In other words, stability is dependent on the height-to-width ratio of the stacked crib and should not exceed three to one, so if you’re using 18-inch long pieces the stack height should be no more than 54 inches.
When building box cribs, ensure proper alignment of the cribbing pieces over one another as you are building each layer, otherwise the weight-bearing capacity will be affected.
One other advantage of using softwood for blocking is that it offers a warning sign for overload. When the wood has been loaded beyond its working capacity, signs of failure are evident with loud cracking noises and visible cracks in the wood. Failure is usually slow and for that reason softwood is ideal when working with unknown weight loads. This application pertains more to heavy rescue work that involves large commercial vehicles such as overturned cement trucks.
 Step chocks
Step chocks have become very popular in vehicle stabilization for a variety of reasons. They are inexpensive and easy to construct, they are very simple to use, they offer multiple height variances when used properly and they fit well into the storage compartments.
Building your own step chocks
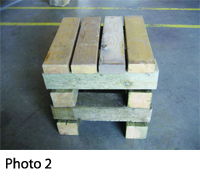
Use six pieces of treated or untreated softwood, 2 inches x 6 inches wide, and cut the bottom piece roughly 24 inches long or whatever length will fit well into your cribbing storage compartments. Cut a second piece the same length and spread wood-bonding adhesive such as Lumber Lock or Epoxy between each of the two layers of wood you are matting together. Next, insert a few screws into both sides of the matted lumber. Cut a third piece six inches shorter and apply it in the same manner to the existing pieces. Continue to add layers cut six inches shorter than the previous piece until you have roughly a six-inch piece as the top layer. This will give you a maximum working height of about nine inches at the top layer of the step chock. The idea is to take advantage of each step gradient to match the varying height differences of vehicles. These will assist in ensuring that your cribbing tasks are fast and effective.
You may sandwich a length of one-inch webbing between the middle layers of the step chock for a handle (to make it easier to carry the step chock), or you may drill a hole from side to side all the way through and insert a quarter-inch length of rope for the same purpose. You should build at least four step chocks to carry on your truck and a few for backup in case some have to be left at the scene of an incident, so the truck can be re-supplied when you get back to the station.
Stabilizing a vehicle on its wheels
Often, after a crash, vehicles are found upright and on their tires. When dealing with a vehicle in these circumstances, follow your department’s protocol for sizeup, scene safety, inner and outer circle surveys and ignition off. Vehicles should be stabilized in the position found. The first step in the order of stabilization is to chock a tire front and back with 4 x 4s to stop any forward or backward motion of the vehicle. Decide whether to use step chock or cribbing based on the distance between the ground and the vehicle’s rocker panel or undercarriage near the rear and front wheel wells. If you choose to use step chocks, then put one step chock just behind the front tire and another in front of the rear tire on both sides of the vehicle for four-point stabilization. These areas are structurally superior and easily accessible. Avoid cribbing on or near fenders or lower-rear quarter panels as these areas are thin, single layers of sheet metal and do not have a great deal of strength. More often than not fenders or rear quarter panels are damaged from the crash and are weak and quite flexible, which can cause the stabilization to come loose easily.
 Ensure that you have enough room between the underside of the vehicle and the ground to insert the step chock all the way under to avoid a tripping hazard, particularly in the area where there will be tool work performed. You must also pre-plan your location for blocking so that there will be no interference with the opening of doors.
By today’s standards, it is considered unacceptable to physically lift the vehicle to place cribbing underneath. A few years ago, we were accustomed to seeing rescuers brace their backs against the wheel well and dead-lift the side of the car up while another rescuer slid the cribbing in. We have to keep in mind what our goal is while stabilizing; it is to minimize movement to the best of our ability. By lifting the vehicle with brute force we defeat the purpose of what we are trying to accomplish, patient and rescuer safety.
There are three methods to orient the step chock:
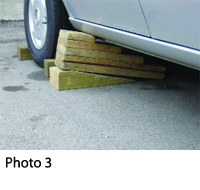
1. Insert the step chock the way it was designed, thus using the multiple steps of the chock to fill in the void between the vehicle and the ground (see photo 3).
Depending on the space to fill, some of the steps may not be the correct height to make contact. If this is the case, insert a wedge the same width as the step chock to fill the void by raising the step up to make contact.
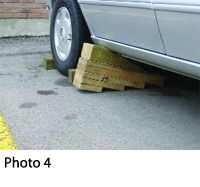
2. Flip the chock over and use it as a large wedge. This method has been controversial among fire personnel. Some argue that the steeper angles produced by inverting the step chock will allow the vehicle to slide off the chock more easily. In addition, there is less contact area with the ground on the underside of the inverted step chock because it is resting only on the thin edge of the steps rather than the full surface of the chock when it is on its 6 x 24-inch base (see photo 4.).
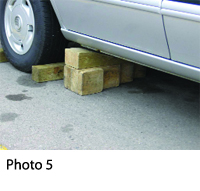
3. This method I find to be the most beneficial to maximize total surface area and increase safety for rescuers by eliminating the tripping hazard. Insert the step chock on its side, taking advantage of the fact that you can usually insert the step chock far enough under the vehicle so that it does not become a tripping hazard, even while using a 4 x 6 wedge on the top or underneath the step chock.
Late-model vehicles are being built with more aerodynamics to aid with fuel economy, and, as a result, the vehicles are lower to the ground (see photo 5). In many cases this allows for the proper height distance required to use the step chock in this manner.
I have used step chocks successfully in all three methods described above. If I’m not having success with one method I switch to another until I’m satisfied with the results.
 Box cribbing
If you find the height difference to be too great to use step chocks for a vehicle, build a stacking box crib by using 4 x 4s multi-oriented and perpendicular to each other until the proper height is achieved. The blocks should be placed on top of each other in order for the weight to bear down on the cribbing blocks directly beneath them. The load may shift and fail if the stack is built one sided or starts to pyramid upward.
Once the box-crib height is built up to a couple of inches from the undercarriage or rocker channel, insert wedges into the space and lightly tap them with a mallet until tight. I often see rescuers hitting the wedges too hard, thereby lifting the opposite side of the vehicle up off the cribbing, which can make it come loose. They then have to constantly run around and keep tapping all the wedges back in.
Another thing to consider when constructing the crib stack is to make sure the outside edges of your box crib are even with the side of the vehicle to avoid creating a tripping hazard.
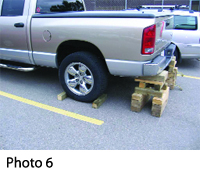
If you happen to be dealing with a full-framed vehicle such as a truck, areas of the lower truck box at the wheel wells are made of thin sheet metal, making these areas unacceptable for cribbing. Some trucks may have running boards, which generally are not strong enough for cribbing either, and you may find it difficult, time consuming and possibly dangerous to reach under the vehicle to construct box cribs on the frame rails. For these reasons, it is acceptable to construct four-point stabilization under the areas of the front and rear bumpers if, after a quick inspection, they are found to be sound and intact. Choosing this location allows much safer and easier access to strengthened areas suitable for this purpose (see photo 6).
Deflating tires?
Deflating tires can make the vehicle rock solid after the blocking is in place. Although this has been a controversial issue for a lot of departments for many years, it has very effective results.
When patients are extricated from crashes by removing components of the vehicle such as glass, roofs or doors, the weight of the vehicle obviously changes, thus the suspension does not have to work as hard. When this happens, the vehicle will rise slightly and continue to do so as weight is removed, until there is no contact with the cribbing. A void will be created and stabilization will be lost.
The objective of removing the air out of the tires is not to lower the vehicle to the cribbing, but more to de-activate the suspension. When the tires are in contact with the ground the suspension is still “working” or intact. If the weight of the vehicle is on the cribbing rather than the suspension, it is no longer active.
Why is deflating the tires controversial?
Here are some of the myths surrounding deflating of tires:
1. Traffic accident investigators can’t properly conduct their investigation if they don’t know what the tire pressure was prior to the crash. Investigators have told me that although deflating the tires could have an impact in the investigation, rescuers and patient-safety considerations come first. If this means deflating the tires for the benefit of the patient or safety of the rescuers, then so be it. If the choice is made to deflate the tires, rescuers should let the accident investigators know it was done by rescuers and not as a result of the crash or the cause of it.
2. It is more difficult for towing companies to tow the vehicle when all the tires are flat. Most auto wreckers carry dollies to handle this problem.
3. It is too time consuming to perform. You should be able to easily deflate four tires in less than a minute by pulling the valve stems out with channel-lock pliers. If you feel the need to re-inflate the tires afterwards and not damage them, you can purchase rescue-style “valve stem removal tool” kits from rescue-tool dealers.
One known contradiction to deflating tires is removing the air out of the low-profile or run-flat tires. Deflating these types of tires may not give you any advantage, as the deflation depth will be minimal.
As you can see, deflating the tires may have its merits.
Once you are confident that the vehicle is adequately stabilized, there should be no movement front to back, side to side or up and down. Now you are ready to continue on with battery disconnection and other associated duties. The average time frame to stabilize a vehicle on its wheels should fall within the two-minute mark.
In the next issue we will look at advanced procedures and options involving side- and roof-resting vehicle accidents.
Remember, the key to a successful extrication is good stabilization, so train hard, train smart, and train often!
Print this page
Advertisement
- Forcible Entry: Choosing, using and maintaining the irons
- Fit for Life: Tips for cold-weather running