
Features
Training
Extrication Tips: The evolution of the air chisel
Hand-held rescue tools such as the pneumatic air chisel were the tools of the trade prior to the introduction of hydraulic cutters, rams and spreaders. The chisel still had a place on the truck, but was used less and less frequently as time went on.
January 6, 2009
By Randy Schmitz
Improvements to versatile tool make it better suited to rescue operations
Hand-held rescue tools such as the pneumatic air chisel were the tools of the trade prior to the introduction of hydraulic cutters, rams and spreaders. The chisel still had a place on the truck, but was used less and less frequently as time went on.
 |
|
One problem rescuers experienced with the original air chisel was the low volume of air it delivered that resulted in sluggish cutting capability. Also, the retainer spring that locks the chisel bit in place had to be unscrewed prior to inserting the shank of the bit, then screwed back on. This works at the body shop but when time is of the essence it becomes problematic. Another concern was that chisel bits broke or became dull quite quickly because they were not made with high-quality alloyed steel, which is necessary for the chisel to be used as a rescue tool. Given these operating issues, it is easy to see why the tool fell out of favour when new options became available.
All that has changed in recent years, however, and the air chisel is making a strong comeback. Many design improvements have been made, with specific attention being paid to fire-service uses. Higher volumes of air can now be delivered at the 200-psi range as opposed to the former standard 90-psi, thus improving speed and allowing heavier, thicker metals such as door hinges to be cut with minimal effort.
Assembly time for loading the chisel bits has been significantly reduced as the bit retainer has been changed to a
spring-loaded retractable collar design that allows safe and efficient insertion and exchange.
Numerous sizes and lengths have been designed into the chisel bits to provide different applications that have expanded the use of this tool.
Here are a few uses for the air chisel.
Using this tool to complement hydraulic tools can be a huge asset to extrication procedures. Door hinges and Nader pins can easily be exposed by cutting away the thin sheet metal that surrounds them. This allows for uninhibited placement of cutter blades and spreader tips to cut or spread crushed vehicle components.
The chisel may also be a better choice if you’re working in tight spaces and don’t have room to bring in hydraulics.
Search-and-rescue groups have used this tool in building collapses and confined space environments when tasks involve breaking masonry walls, penetrating concrete floors, breaking apart locks, digging for tunnel operations and cutting rebar and other metal composites.
Other possible applications include third door conversion; roof removal; seat removal; cutting crushed sheet metal; cutting hinges, Nader pins; removing bolt heads; trunk tunnelling; and door handle cut-out for linkage access.
 |
|
| Photos by Randy Schmitz Photo 1 |
|
 |
|
| Photo 2 | |
 |
|
| Photo 3 | |
 |
|
| Photo 4 | |
 |
|
| Photo 5 | |
 |
|
| Photo 6 | |
 |
|
| Photo 7 | |
 |
|
| Photo 8 | |
 |
|
| Photo 9 | |
 |
|
| Photo 10 | |
 |
|
| Photo 11 | |
 |
|
| Photo 12 |
Design and function
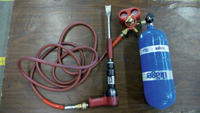
The pneumatic air chisel is made up of essentially four components: an air supply; air regulator; hose; the chisel; and assorted cutting bits. (See photo 1.)
The air supply may come from a couple of different sources, such as a 2200- or 4500-psi breathing apparatus bottle where the high-pressure regulator is screwed directly onto the bottle, or a portable cascade system with its own high-pressure regulator hard plumbed into the rescue truck. Either way, a regulator will reduce the air down to a manageable working pressure from a high-pressure source.
In general, a three-eighths inch air hose with quick-disconnect couplers attaches between the regulator and air chisel and delivers the reduced air pressure.
The air chisel body is constructed out of metal and weighs about five pounds with an overall length of about nine inches.
There are several operating pressures, depending on the manufacturer, the chisel bits being used and the tasks being performed.
Ajax air chisel pressures for instance range from 90 psi up to 200 psi. (Keep in mind that most air chisels that are made for industrial markets such as mechanical and autobody shops have a maximum working pressure of 90 psi, which is usually stamped on the cylinder of the chisel. This has been proven the most efficient operating pressure for prolonged use of the tool in an industrial setting. However, chisels designed for rescue work are capable of much higher working pressures, which allows for extra air power when needed.)
With the air pressure set and the trigger button depressed, a piston inside the cylinder will move back and forth roughly three inches to make contact with the end of the chisel bit that is inserted into the retainer. This moves the bit forward and starts to penetrate into the material.
(Note: At 90 psi, an Ajax Super-Duty Air Hammer will have 1,560 blows per minute. This term describes how many times the piston goes back and forth within the cylinder. The lower the BPM a tool has, the harder it hits the chisel. In other words, a lower BPM results in more impact or cutting power in the tool.)
Chisel bits
There are many designs and styles of chisel bits depending on the application and they generally range from six inches to 18 inches in length. Most manufactured chisel bits are built to rotate while cutting metal; the user can direct the blade of the bit by holding onto the shank and turning it left or right for the desired effect. Along with a turn type bit, Ajax chisel kits offer a non-turn style bit; this will keep the bit oriented in one position so the user can operate the chisel with both hands for hard-to-reach tasks or accurate work and not have to hold onto the shank.
Here are the three most commonly used bits for extrication:
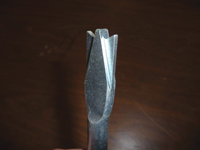
• Panel cutter – for cutting single layer sheet metal (see photo 2);
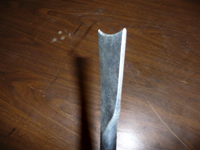
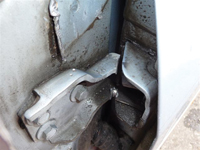
• Kwik or curved cutter – for cutting heavy gauge metal such as door hinges, hood brackets (see photo 3);
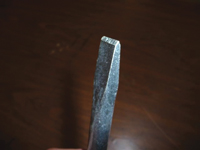
• Narrow flat chisel – for cutting and shearing off bolt heads (see photo 4)
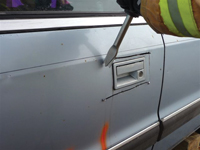
A panel cutter can have a single or double blade and works best for cutting thin or single layers of sheet metal such as a door skin or undamaged top layer of metal from a vehicle’s room.
This bit design allows the user to easily guide it in the intended direction and is a good start for first time users to train with and get a feel for the tool. (See photo 5.) Although this bit can be very useful it has its limits. One complication is that while making an attempt to cut a cross-member or brace that may be attached underneath the outer skin layer, the panel cutter bit will slow down significantly almost to the point that it becomes ineffective.
Another potential problem arises when an effort is made to cut sheet metal that has been damaged and crumpled from an impact. In this case, it can be extremely difficult to successfully keep the bit embedded in the metal while pushing it forward.
Even so, this bit is capable of clean, accurate and extremely fast metal removal when used in the correct application. For proper cutting technique, place both hands on the gun, position the bit with one of the cutting points at a 45-degree angle to the sheet metal, press firmly then slowly pull the trigger until the bit embeds itself, slightly lower the bit towards the surface and push lightly forward while allowing the tool to do the work.
Practise making straight accurate lines, curves, turns and circles. When you can successfully write you name in the hood or roof section of a vehicle, it is time to move on to the next level in metal cutting.
The Kwik or curved cutter bit is probably the most versatile and convenient for experienced users.
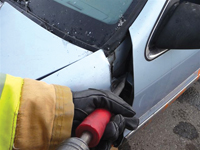
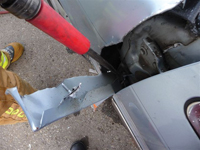
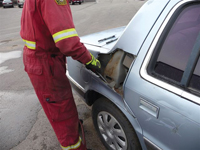
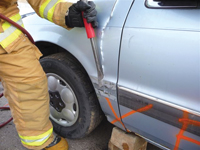
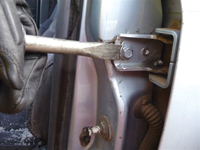
If you are proficient with this tool, an advantage to this bit is that you can use it for almost all of your metal cutting/removal needs. It is capable of cutting sheet metal alone, crumpled up, double or triple layers of steel, thick hood and door hinges and Nader pins. (See photos 6 and 7.) Because the bits are offered in different lengths, the user is able to work in extremely confined or hard-to-reach locations. (See photos 8 and 9.) In addition, the curved cutting edge helps keep the bit embedded in the material. (See photo 10.)
Start the cut by placing one edge firmly against the material at a 45-degree angle then pull the trigger just until the bit sinks in. Do not let the bit drive itself in too deep or it is likely it will become stuck in the metal. Maintain about half of the blade above the material being cut. Try using it at a vertical orientation and also laying it flat against the material and sliding it along for effective cutting.
When cutting thick, metal door hinges, try to keep the metal in the blade centre.
If the blade does become buried and stuck, attempts to rock it from side to side or “pry” will put the bit under high stress and it will likely break. Instead, slowly move it up and down while pulling the trigger in short bursts. After a couple of attempts it will usually free itself.
It takes practice to become efficient with this bit, but after making a few straight, curved cuts in sheet metal and attempting some door hinges, you will become confident enough to use it in a rescue situation.
A narrow flat chisel comes in handy when a bolt head or nut needs to be severed. The blade design for this type of bit is significantly thicker than the curved chisel, which permits the user to place the sharp edge behind the nut or bolt head and simply sheer it off.
Helpful points to keep in mind: hold the bit firmly behind the bolt head and give a few short bursts of air pressure from the trigger – this will penetrate the metal to create a slight groove so the bit won’t slip off. (See photo 11.)
Once a good-sized gap is formed, keep constant pressure on the gun and hold until it pops off. For thick or stubborn bolt heads, work the tool all the way around the edges of it until you are successful.
General assembly and operation
If using a portable compressed-air source, thread the regulator directly onto the bottle. Connect the air hose to the regulator, then the air chisel to the hose, via the quick connect couplers. Select the proper bit for the application, pull back the bit retainer and insert the bit, then release it, giving a tug to ensure it is seated properly.
Turn on the air from the bottle, set regulator for the desired pressure. The system is ready for operation; press the bit against a hard surface and test fire.
Caution: never dry fire an air chisel, this will add extreme wear on the piston, cylinder and also the bit and cause it to mushroom and become problematic to remove from the retainer.
Become familiar with how much air it takes to perform specific tasks; for instance, setting the regulator pressure to roughly 90-100 psi (sheet metal cutting) will normally give between 15 and 20 minutes of cutting time if using a 4500-psi bottle. Operating the tool at 200-psi while cutting thick metal like a door hinge, will give you about 10 minutes, depending on how efficient the tool is being used.
Trouble shooting
• Loss of power – If the chisel appears to have lost power and a noticeable sound of air hissing past the steel barrel is heard, the retaining coupler has probably started to come loose. Solution: Tighten up the setscrews on the coupler housing; this should stop the air leak.
• Chisel does not activate when the trigger is pulled: a) This usually happens when there has not been enough lubrication within the cylinder and the piston has become stuck. b) The tool has extreme frost built up on the gun, hose and/or regulator. Solution: a) Lightly tap the back end of the cylinder portion of the chisel with a plastic mallet, as this will dislodge the piston. Ensure proper lubrication before using the chisel again. b) Reduce high flow air pressure, this will diminish frost buildup on the components if the regulator has been set on maximum pressure for too long and has stopped completely or has become extremely sluggish.
Best practices
• Always adjust your pressure settings for the given task to conserve air, don’t run the tool at a higher pressure than needed.
• When disassembling the system, always turn off the main air
supply then bleed down the system of the remaining air by holding the bit against a hard surface and pulling the trigger. Disconnecting a pressurized system is destructive, dangerous and unnecessary.
• After each use lubricate the air chisel with pneumatic tool oil. Put five or six drops into the air inlet and also the cylinder to lubricate it and the piston. It cannot be stressed enough how important this preventive maintenance step is, more problems are caused from under lubrication than anything else.
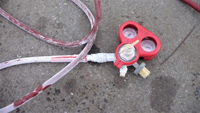
• Add a silica gel packet to the air chisel storage container, this will help combat moisture. Condensation will continue to build up on the tool even after they have been put away, especially if they have been used at higher pressures. (See photo 12.)
• After every use the chisel bits need to be checked for wear and tear and sharpened or replaced if necessary. Using dull, chipped or damaged bits will cause nothing but grief.
Safety tips
• Always wear impact resistant eye and face protection when working with or near the operation of air tools.
• Do not exceed rated air pressure to increase the output of the tool. This could cause injury and shorten tool life.
• Hearing protection is highly recommended during air chisel evolutions.
• Rescue tools can be loud when working in close proximity to patients and rescuers alike, work in short duration then stop and listen. Make sure the medics, patients etc., are OK prior to continuing with metal cutting operations. Do this frequently!
• Never point the air chisel at anyone, if the chisel bit is not secured in the retaining coupler correctly it could dislodge and injure someone when the trigger is depressed.
• Keep your finger away from the trigger until you are ready to work.
• Use only the manufacturer’s chisel bits.
In the April issue we will look at specific chisel evolutions more in detail.
In October’s Extrication Tips column, Randy Schmitz discussed vehicle entry. A model guideline for vehicle lockouts, developed by Schmitz and that your department can adopt, is online at www.firefightingincanada.com , on our home page under Recommended.
Print this page