
Features
Training
Extrication Tips: April 2013
In part two of my hand tools series, in the January issue of Canadian Firefighter and EMS Quarterly, we looked at a few different applications for the First Responder Jack (FRJ) in extrication.
March 22, 2013
By Randy Schmitz
In part two of my hand tools series, in the January issue of Canadian Firefighter and EMS Quarterly, we looked at a few different applications for the First Responder Jack (FRJ) in extrication. In this final instalment, we will explore other possibilities for use of the FRJ. Keep in mind that using a jack should be secondary to choosing hydraulic rescue tools such as spreaders, cutters and rams; however, the capacities of the FRJ should not be discredited simply because the tool lacks the power and speed of hydraulics. The FRJ is an alternative when standard tool choices are not available, or when the hydraulic tools break or are being used elsewhere during larger-scale extrications.
 |
|
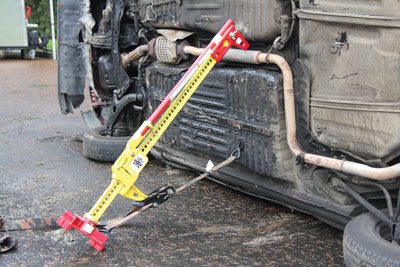
| Photo 1: Use the First Responder Jack (FRJ) to stabilize a side-resting vehicle before rescue struts can be installed. Photo by Jeff Pugh |
|
 |
|
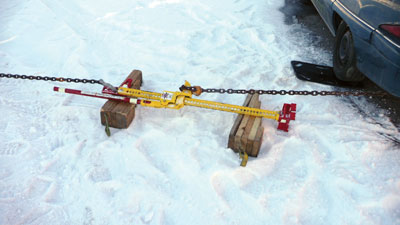
| Photo 2: To use the jack as a winch, connect one end of the jack to an anchor point and the other end to the vehicle to be moved. Remove the slack from the chains and begin to slowly operate the jack handle. Photo By Randy Schmitz |
|
 |
|
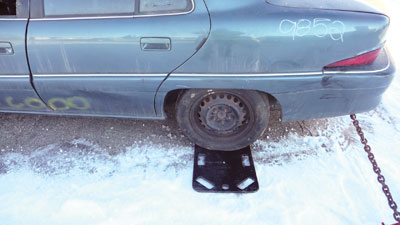
| Photo 3: Placing a hard protection board, or some means of a slide, under the tire closest to the jack will help to ensure a smooth and controlled movement. Photo By Randy Schmitz |
|
 |
|
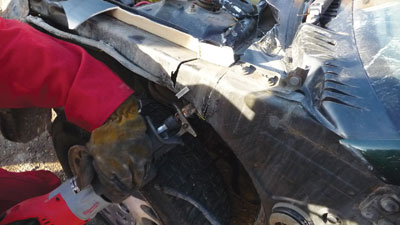
| Photo 4: To relocate the dash, make a relief cut between the strut tower, which is part of the front suspension, and the firewall. This will allow for the forward movement of the metal that will be relocated. Photo By Randy Schmitz |
|
 |
|
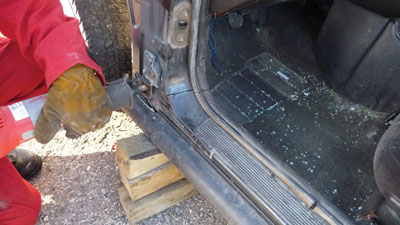
| Photo 5: Cut a notch in the lower A-pillar, in order to make room to insert the baseplate and runner of the jack. Photo By Randy Schmitz |
|
 |
|
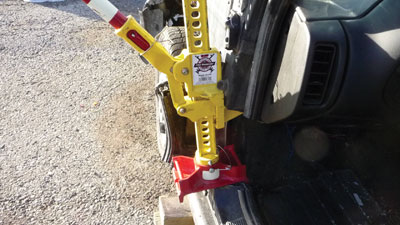
| Photo 6: Insert the jack into the notch made in the A-pillar and operate the handle until there is a slight pressure. Temporarily lock the handle with duct tape. Photo By Randy Schmitz |
|
 |
|
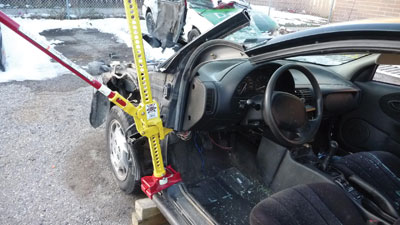
| Photo 7: Operate the jack handle to engage the lift. Watch closely for all movement. Photo By Randy Schmitz |
|
 |
|
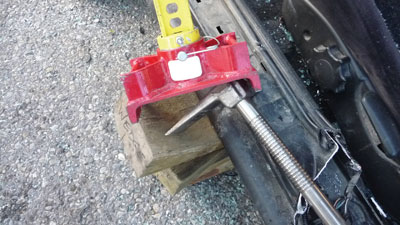
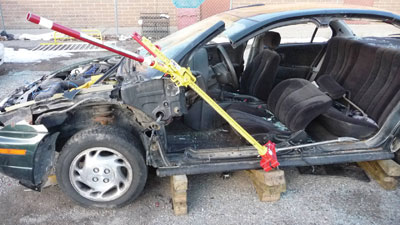
| Photo 8: When moving the dash forward, use the adz end of a Halligan bar as a push point for the baseplate of the jack. Use cribbing to block up the adz end, keeping it in place. | |
 |
|
| Photo 9: Insert the jack with the runner against the upper A-pillar of the vehicle and the baseplate on the adz end of the Halligan bar.
|
Side-resting vehicle support
First responders may not have standard strut systems on the first-arriving apparatus, so an option is to carefully place initial cribbing on the side of the vehicle that is most likely to roll over. For extra safety, consider inserting the cribbing in place with a pike pole in order to stay out of the rollover zone. Once these cribbing components are placed, it should be safer to insert the FRJ.
Re-adjust the red clamp clevis so that it is at the end of the steel bar of the jack to act as a grip point on the vehicle. At an angle, place the top of the jack to rest on a solid component such as a frame rail, allowing the baseplate to grip into the ground.
At this point, attach a 1,260-kilogram- (3,000-pound) rated ratchet strap from the baseplate to the vehicle, at a low point if possible.
Now, with one person on the end of the vehicle monitoring for movement, carefully tighten up the ratchet strap until the vehicle no longer moves. If the vehicle starts to lift you have gone too far. This process should allow you to safely make the vehicle stable enough to gain entry or provide enough temporary stabilization until rescue struts can be installed (see photo 1).
Winching with the FRJ
On occasion, the best course of action may be to move a vehicle off an object to gain access to a patient, or even to another vehicle. An FRJ can be used to carefully move a vehicle in a controlled manner. Two chains and a two-step chock will be required along with the FRJ. First, find a spot on the vehicle to which it would be safe to attach chains, such as the bumper area or a factory-installed tow hook. A suitable anchor point will be required, such as a larger rescue vehicle, oriented at 90 degrees to the vehicle to be moved.
Attach another chain set to the anchor point and then to the end of the clevis clamp either by a hook or by inserting the chain into the intended chain slot. Then, the chain set from the vehicle to be moved is hooked around the runner portion of the jack. Remove all slack from the chains. (see photo 2).
Slowly operate the jack handle to increase tension on the chains. Again, one rescuer should have his hands on the moving vehicle to monitor for unwanted movement at all times. You may find that a hard protection board placed under the tire closest to the jack will help to ensure a smooth and controlled movement (see photo 3).
Jacking a dash with the FRJ
When the dash needs to be removed, the FRJ can be used. The two methods we’ll discuss require the complete disconnection of the dash component from the rest of the vehicle; this is due to the fact that the safe working-load lifting capacity of the jack is limited to 2,273 kilograms (4,660 pounds). In order to do this, strategic relief cuts will have to be made. Once the door and front fender are removed, make a relief cut between the strut tower, which is part of the front suspension, and the firewall (see photo 4). This allows for the forward movement of the metal. The next cut is a notch in the lower A-pillar in order to make room to insert the baseplate and runner of the jack (see photo 5). Insert the jack (see photo 6) and operate the handle until there is slight pressure on the metal but not too much resistance on the handle. Lock the handle off temporarily. The next step is to make one final cut in the upper A-pillar to reduce the amount of resistance and force required to lift the dash with the jack. We want upward pressure on the jack before making this cut so that when the upper A-pillar is finally severed, the dash will move slightly upward and not downward. At this point, start to operate the jack handle to engage the lift.
An alternative method of dash relocation is to push the dash forward rather than up; this depends on which way the dash or metal components need to be moved away from a patient. Instead of inserting the jack in the lower A-pillar, use a push point from the baseplate at an angle. If the B-pillar has been removed for patient egress or if the vehicle is designed so that it simply doesn’t have a B-pillar (as is the case with, for example, a Honda Element) then this method may work. Again, the upper front rail, and the upper and lower A-pillars require relief-cut locations. Once these are made, we can proceed with the evolution. This time, the push-point position for the baseplate will be off of another hand tool that most first response trucks carry – the standard Halligan bar. Remove the trim from the lower rocker panel and find a suitable hole from under the plastic trim. Place the pointed end of the bar into a hole and carefully tap the pointed end into the rocker panel until it is about three-quarters inserted. The adz end of the bar (the flat piece) will be used as a push point for the baseplate of the jack (see photo 8). Block up the adz end with cribbing and wedges so it will not slip. Insert the FRJ with the runner against the upper A-pillar and the baseplate on the adz end of the Halligan bar (see photo 9). Engage the handle, push the dash and watch for movement.
I can’t stress enough that these evolutions need to be practised and refined in training sessions before they are attempted in the field.
Until next time . . . stay safe out there!
Randy Schmitz is a Calgary firefighter who has been extensively involved in the extrication field for 19 years. He is an extrication instructor and has competed internationally. He is the education chair for Transport Emergency Rescue Committee (T.E.R.C.) in Canada, a T.E.R.C. International extrication judge and a tester and evaluator for manufactured prototype products for extrication equipment. He can be reached at rwschmitz@shaw.ca. Follow him on Twitter at @firedog7
Print this page