Equipment
Truck Tech: February 2013
In November, we talked a little about the all-terrain vehicle (ATV) in the fire service. For our purposes, ATVs refer to all those motorized machines – snowmobiles, quads, six-wheel and eight-wheel drive vehicles, motorcycles and amphibious machines – that run off the man-made roadways and in areas where roads and trails are not well paved.
February 5, 2013
By Chris Dennis
In November, we talked a little about the all-terrain vehicle (ATV) in the fire service. For our purposes, ATVs refer to all those motorized machines – snowmobiles, quads, six-wheel and eight-wheel drive vehicles, motorcycles and amphibious machines – that run off the man-made roadways and in areas where roads and trails are not well paved.
Any gasoline-powered machine, be it four-stroke or two-stroke, requires regular fuel changes. Winter fuel and summer fuel are two different creatures. Be sure to drain and freshen up gasoline and change fuel filters at the same time that you refresh batteries in your smoke alarms. For machines that are powered by two-stroke engines, be sure the same procedure is followed and, if the engine is oil-injected, ensure that the reservoirs are full. It is important that the fuel-to-oil mix ratio is correct and based on the manufacturer’s specifications. In most cases, oil manufactures will list on the bottle the oil-to-fuel mix rates, based on fuel-container size, and the amounts of oil to mix in.
Tip: Pour oil in first; this allows the fuel and oil to mix well when the gas is added to the container.
ATVs sometimes sit for long periods. The suggested time periods for inspections on these types of vehicles depend on the amount of use, but should be based on hours of use rather than mileage. Be sure gasoline is fresh and full in both the machine and the gas cans. Next, check the engine oil levels. Refer to the owner’s manual for dipstick locations on four-stroke engines and, if the machine has a two-stroke engine, look for the correct injection oil to use and the fuel-to-oil mix ratios. Be sure that you have extra oil on hand and try not to mix oil types and makes; cross-contamination has been known to reduce engine life.
Make sure that the unit starts. Remember that this is preventive maintenance (PM). If the differential transmission, transfer case fluids, cooling systems and chain case oils are full, and there are no traces of leaking fluids on the ground, start the engine. Then, with the key set to “off” and the kill switch engaged, perform the following checks.
If the vehicle is a pull start, slowly pull the rope all the way out until it stops. Inspect the rope for cuts or contamination and make sure the knot in the pull handle is secure so it does not pull through. If the knot in the handle is not secure, and the rope breaks when you pull on it to start the machine, the rope will pull through the handle and into the recoil. The rope inspection is complete.
Be sure the throttle is moving freely and that the parking brake and hand brakes are working. Inspect the drive belt for visible missing pieces or cracks in the cogs on the bottom side. Turn the key on and turn the kill switch to offset the choke if the machine is equipped to do so (fuel-injected engines have electronic cold-start features). Pull the cord until the engine starts. Let the engine run up to operating temperature and shut it down using the kill switch. This enables you to verify that the switch is working. The same process applies to electric-start engines. If the machine is equipped with a back-up pull cord, check it before starting. With electric-start engines, this start-up process will also tell you how strong the battery is just by how quickly it turns over the engine.
Some of you may wonder why I recommend starting the engine so soon. If you take the time to do a thorough maintenance inspection – which could take an hour or so – and you then try to start the engine, only to find that the battery is dead, you could have been dealing with the starting problem an hour sooner. Nothing else matters if the engine does not run.
Now, the engine makes noise and, since we have done all this in a well-ventilated area, it will not be necessary to apologize to the chief for smoking out his fire hall, especially if this engine is a two-stroke.
It’s time now to do a circle check and basic PM. Please have these items present:
- Clipboard and Out of Service tags
- Checklist and pencil
- Safety glasses and gloves (PPE)
- Cribbing
- Rags
- Hand-pump grease gun with appropriate grease
- Kitchen sink liquid detergent
- Airline with tire gauge and air chuck
- Air blower
- Assortment of vehicle fluids
- Zip ties
- Wash brush, soap, water and wax
- Masking tape or Post-it notes
Break down the vehicle into four quadrants and start at the front, working to the right. If the vehicle is equipped with batteries, turn on the lighting system, not the emergency light package. You are checking for broken or missing pieces and making sure that all lights on the front are functional. If the vehicle has a winch, ensure that it works and the cable is not damaged.
Tip: As you find items that are not as they should be, tag them with a Post-it note or a piece of masking tape. Number that item and do the same on the checklist. This way, you can ask for a second opinion and do not have to try to remember where or what the deficiency was.
Move to your machine’s left. If the vehicle is equipped with licensing and registration numbers, be sure they are valid, legible and completely intact, and ensure that the appropriate ownership and insurance slips are with the machine. Check the body condition. If the ATV is equipped with side lighting, be sure that it works. Move to the left front tire, ski or track assembly on the steering end; check the assembly and suspension on this side. If any wires are hanging down, be sure to zip-tie them out of the way. Record and tag any damages.
 |
|
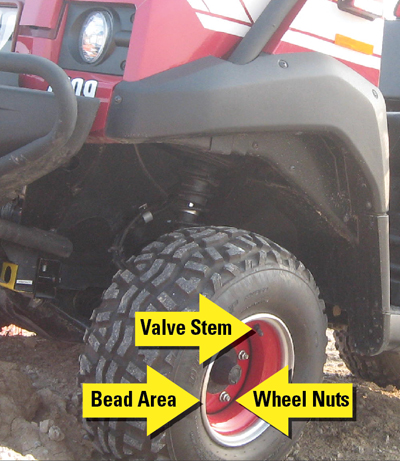
| PHOTO 1: The typical wheel found on an ATV; this photo highlights the location of the wheel nut, the bead area, and the valve stem. All photos by Chris Dennis
|
Now move to the tire. Start at the tread area and check all around for cuts, tears or punctures. Move down the sidewall, checking for cuts, gouges or punctures. On the front and back sides, check the rims for dents. Bead leaks can be detected with soapy water. If the wheels are aluminum, be sure no chunks are missing; the wheels could still be holding air. If the aluminum rim is bent in a bead area (see photo 1), it may have to be replaced. A steel rim may be repairable once the tire is removed from the rim. Ensure that wheel nuts (see photo 1) are tight and check to be sure that the valve stem (see photo 1) is secure and is not leaking. If the valve stem is flexible, bend it back and forth and listen for air leaks, or apply soapy water to the area and check for bubbles. The same can be done with the screws in the valve stems; they will not bend, but soapy water will show bubbles if the screws are causing a leak. Valve-stem caps must also be in place. Missing caps can allow water to get into the valve core area and freeze, depressing the valve core and causing slow leaks and, eventually, flat tires. The same is true for mud. Pouring soapy water over the core will allow you to determine if the valve core is defective and leaking. A well-fitting valve stem cap can hold back an air leak from a defective core. If there are multiple tires on a single side, perform the same inspection for each tire. Lastly, check all tire pressures to manufacturer’s specifications, not to what is on the sidewall, unless instructed to do so.
 |
|
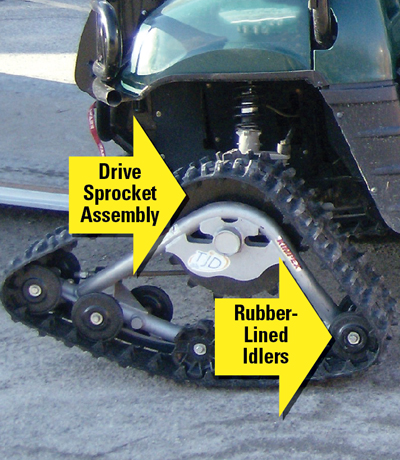
| PHOTO 2: The typical track found on a track-equipped ATV; this photo highlights the location of the drive sprocket assembly and the rubber-lined idlers.
|
Track-equipped ATVs can be inspected in the same fashion as the tire. Ensure that tracks are not torn and that all cleats or carbide picks are secure and have not been torn off. Be sure that drive sprocket assemblies (see photo 2) are bolted to the drive wheel end and are secure, and that all teeth or rubber-lined idlers (see photo 2) are intact. Idler wheel followers should be in place and not damaged.
Ski-equipped steering ends should also checked in this fashion. Check the top side of the ski for dents and, if the large plastic pieces are missing, move inward to check that the mount and the steering strut ends are tight and are not damaged. Be sure that the ski’s runner is secured with all its hardware. The runner bolts come through from the underside, so the mounting nuts are in the top side centre valley of the ski. With a helper, lift the ski tip up as far as it will go, or move the machine slightly up onto the opposite side just enough to expose the complete underside of the ski. Crib the machine in this position for safety. If the runner is carbide, check its condition and shape. If the ski is steel, ensure that it has not rubbed through anywhere. Plastic skis or ski skins should be in one piece with the runner intact. With your helper, remove the cribbing and bring the machine back down to its resting place.
Now inspect the suspension and steering components. Inspect the rubber or Teflon bushings, shocks, springs, gas-charged cylinders, struts, tie-rod ends, cotter pins, locking nuts and all links. Check the steering column and the grips to be sure that all are in place, move freely and are not damaged.
With the correct PPE on, use a clean rag, soap and water to wash away all dirt and/or ice build-up around rubbers and swivel ends of the steering components, wheels, skis and tracks. Be careful around cotter pins; they bite. Once these items are cleaned, use a blower to dry all areas that have been washed.
Wipe excess dirt from the nipples of a grease gun so that, when greasing, you do not push dirt into nipple check ball; this can contaminate the ball socket and possibly not allow the check ball end of the grease nipple to close completely, causing grease to pump back out. A hand-pump grease gun gives the operator more control of what is going into the ball socket.
Over-greasing with high pressure will damage the dust-guard boot, allowing dirt and water to get in. A hand unit requires slow, steady pumps. Try not to damage the dust boot if the gun is so equipped and, if it is not equipped, pump the grease gun just enough to see the grease come out from around the ball socket in one place. Where rubber or Teflon bushings are to be found, liquid detergent can be applied. This will keep the bushings supple and lubricated. Using liquid soap instead of penetrating fluid will allow the dirt to be washed away. Dry silicone spray can be used as well. Be sure to re-apply this liquid detergent after the machine has been used, as it will wash away in snow and water crossings.
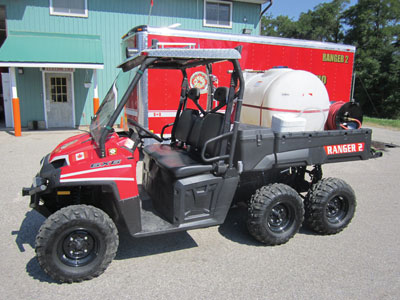
Move to the left rear side of the machine; this is where you will find the balance of a multi-wheeled unit (see photo 3), a snow track, a wheel-end mounted track or a single rubber tire. Perform the same visual inspection you did on the front drive units and suspension. Wash and lubricate grease points, rubber and Teflon bushing areas. There is one difference: If your ATV is a snow machine, add the following inspections.
 |
|
| PHOTO 3: Some ATVs, like the one pictured, have more than four wheels. This vehicle is a six-wheeled unit.
|
With a helper, lift the back of the snowmobile. Crib the back of the machine so the track is left to hang freely. With the engine not running and the machine safely blocked up, inspect the suspension. Check the condition of the sliders, the idler wheels and bogies, the shocks and springs, the cross shafts, the jack shafts and the suspension. Hold back all straps and bearings; this area can also be washed out, air dried, wiped down and its shafts lubricated in the same way that you did the front. Be sure to use the manufacturer’s recommend grease. Look at the rear of the track, where the mud flap is, and rotate the track by hand. Inspect all sprockets or cog holes to be sure that the steel wraps are in place. If the track is equipped with picks, be sure all are tight and intact. Check the outer edges of the track for chunks missing or tears. Older machines will show weather cracking in the rubber. Large enough weather cracks will cause a track to fail. Ensure that the sliders are at the correct thickness from front to back, and be sure that the thickness is consistent. Once the tracks wear through, they wear into the aluminum rails and that will result in major repairs. After all of these areas are inspected, make sure the check sheet is updated. If a deficiency is evident, tag it with masking tape or a Post-it note.
Now move to the rear of your machine. Check the lighting, tailgate, mud flaps, tow hitch, rear-mounted winch, cables, and so on, and note any defects. Move to the right side of the machine and perform the same sequence of inspections, cleaning and lubricating that you did on the left side.
Be sure you are in a well-ventilated area and start the machine. While it is warming up, check the seat condition, seat-belt operations and the emergency light package. Take one more walk around to inspect the emergency light package and do one more system light check. We do these inspections separately because flashing lights can draw our eyes away from the system lighting and we might miss something. If any defects are found, record them on the check sheet, tag them and report them to the next in command. Should the defects be bad enough that the machine may not be reliable or safe, tag the machine Out of Service. Finally, give the machine a complete wash and wax to show our community the pride we have in our equipment and to maintain its appearance.
Now we are done. Every manufacturer creates an owner’s manual for safety and maintenance. Follow these guidelines and you will be more than prepared when you are called into action. Recommended oils, lubes and places to find checkpoints are all listed in the owner’s manual. If the manual is not at hand, Google your machine’s make and model and you will find the manual online. Drive safely, follow the safety regulations set out for off-road use, and remember, we are responding to the incident – we do not want to be the incident.
Rubber side down, my friends.
Chris Dennis is the chief mechanical officer for Vaughan Fire & Rescue Services in Ontario. He can be reached at Chris.Dennis@vaughan.ca
Print this page